I saw a post about making solar lights out of Mason Jars. It said to paint them inside with glow-in-the-dark paint. They didn't glow, so I inserted solar lights and all was well.
I was inspired by two posts at Crafty Gardener's blog to upscale my jars. I used cabin art supplies and Christmas tissue paper to redo my picnic table Mason Jar solar lights.
 |
| The jar lights before their makeover. |
I had Elmer's glue, so I mixed it one part glue to three parts water to make a decoupage medium. You can buy expensive versions, but this works just as well.
I tore the red and white tissue paper into irregular pieces. I didn't want any with straight edges.
 |
| Decoupage glue with a wide brush. |
Starting at the bottom, I alternated and overlapped the two colours to make a pleasing pattern. The white was opaque, so I did that part in double layers.
 |
| Painting the mason jar rings and tops. |
 My lights are smaller than the rings, so I cut a hole in the middle of a jar lid. It doesn't have to be perfectly round. The solar light, when inserted, will cover up the edges. Don't cut yourself.
 |
| Spraying on a protective coat. |
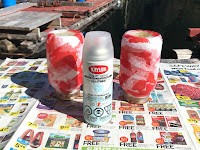
Once the lids were screwed on, I sprayed the jars from all angles with three coats of Krylon Colormaster Clear Finish. This protects the paper from scraping and gives it a water resistant surface.
As a Craft Room De-Stash Challenge (use what you have) here's my cost.
2 reused one quart Mason jars $0.00
Elmer's glue from my shelf $0.00
Tissue paper from Christmas $0.00
2 jar rings from my canning stuff $0.00
2 reused solar lights from before $0.00
Paint brush from my collection $0.00
Krylon spray from my supplies $0.00
The last step was to reinsert the solar lights. I'd already removed the long tubes normally used to stake them in the ground.
 |
| Upscaled Mason Jar solar lights on my front port picnic table. |
During the day they are definitely red and white. At night, they take on a golden glow because of the old yellow paint inside. I like them both ways. How about you? -- Margy

I tried that one time and while it seems to work I didn't like my colors---choices--hmmmmmmm
ReplyDeleteBTW: per your comment on my blog---no bulb digging yet---not until late summer. The daffs are all blooming and the Tulips have begun
MB
I was wondering if the plowed field was for flowers. Potatoes? For free, it was worth a try at a new look. I was getting tired of the plain yellow, especially during the day. - Margy
DeleteWhat a fun project! I have some podgy stuff, too.
ReplyDeleteCrafts are fun. - Margy
DeleteMargy - Like you, I get a big kick out of creating something new out of stuff that is just taking up space around the house. Your result is lovely. I think I like them best with the golden glow. Thanks for linking up to Mosaic Monday this week!
ReplyDeleteIt was a surprise, but I guess I should have expected it with the yellow paint on the inside. - Margy
DeleteWhat a neat idea. Mood lighting!
ReplyDeleteAnd easy. A plus. - Margy
DeleteLooks great!
ReplyDeleteVery clever!
ReplyDelete...clever way to let the sun shine!
ReplyDeletethese are fabulous and so effective! I've seen similar I think hanging from patio beams or tree branches. I love the $0 cost! Have a great weekend, and thank you for visiting my blog this week.
ReplyDeleteWith the solar cell on the top I have to put them somewhere they get enough sun to work well into the night. - Margy
DeleteJust a comment about the tulips---They are just ready to bloom out. They are slow this year and next week will be perfect to see them
ReplyDeleteMB
Thanks. It is such a draw for crowds when they are out full. - Margy
DeleteWhat a great way to add some light to the patio!
ReplyDeleteIf we get home after dark, which we try not to do regularly, I can use one to see the lock on the door. - Margy
Delete