Saturday, December 31, 2016

5 Favourite 2016 Margy Meanders Posts


Come along on a year-end tour
of the five most popular
2016 Margy Meanders posts.

My Margy Meanders blog is where I share posts about general topics. It's a relatively new blog, and I'm pleased that it's gaining in popularity thanks to you my faithful readers.  Looking back at 2016, here are some of the most popular posts.

Landing at Jefferson County Airport near Port Townsend.
Flying Day Trip to Port Townsend, WA -- When Wayne and I come to Bellingham we love to get our Piper Arrow 997 out of the hangar and take her on adventures. A favourite day trip destination is Jefferson County Airport near Port Townsend, Washington. There's a great place to eat on the field called the Spruce Goose Cafe.  When we have more time and good weather, we like to go camping in our plane on Orcas Island, Chehalis, and Siletz Bay in Oregon. We hope to get back to them again 2017.

Cinnamon Spiced Apple Spritzer
Cinnamon Spiced Apple Spritzer -- This year I did more canning and preserving than ever before. Some of my successes were dill pickles, sweet relish, and grape and plum jam. When I canned apples gleaned from a tree in the backcountry, I had lots of syrup left over. Not wanting to waste anything, I created a refreshing spritzer to cool off after all that hot work canning. Then on a snowy day this winter, I used some of the syrup from a jar of the apples to make a cinnamon apple snow cone.

Border between Canadian Zero Avenue and US Boundary Road.
Border Songs by Jim Lynch -- Wayne and I are both avid readers. Even though most of the books we read are Kindle e-books, I like to purchase used books of local interest. Powell River thrifts stores have great selections. When I'm in the States, I go to Cozy Corner Books in Ferndale. Chris, the owner, is great and the prices are amazing. Border Songs is the story of a US Border Patrol agent along Washington's border with BC. Knowing both sides made it a very fun read for me.

Soup's on!
Fresh Tomato-Tortilla Soup -- I grew tomatoes this year in my floating garden next to the cabin. I had some trouble with bacterial spots, so I made frozen tomato sauce with what I could save from my crop. After eating a thick tomato based Tortilla Soup at the Costa del Sol in Powell River, I tried making some of my own. My homemade sauce was the perfect consistency, and the flavour was fresh and amazing. I only wish I had frozen more. Next year I'll try canning some for extra.

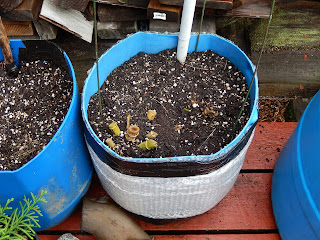
55-gallon barrels become large garden pots.
Something from Nothing: Inexpensive Large Garden Planters -- I grow lots of plants around our cabin's various decks in containers. This year I experimented with two blueberry plants and the grew so large I needed large pots so their roots could expand and produce more berries. Pots are so expensive I decided to make some of my own from 45-gallon plastic barrels we had in storage. With a little bit of paint, they made attractive additions to our float cabin home.


We hope you enjoyed the tour. You can read more about our off-the-grid lifestyle and adventures in Wayne's Coastal BC Stories series of books and e-books. Go to PowellRiverBooks.com for more information and ordering details.

Want to see a review from my Powell River Books blog? Check out my 2016 Top Ten Float Cabin Living Posts. Hope your 2016 was as eventful as ours. Give us an update in the comments below. -- Margy

Thursday, December 29, 2016

Norwegian Yule Kage


Grandma was born in Norway. Her family immigrated to the States when she was a little girl. There's very little of my Norwegian heritage left except for a few Christmas foods. One of them is Yule Kage. It translates as Christmas cake, but it's actually a bread.

Mom made it every Christmas, but I've never made it before. I've had some success lately in making bread, so I thought I would try Yule Kage for Christmas this year.

Mom's recipe file had two cards. One was in Grandma's handwriting and the other in Mom's. Using them together I felt confident enough to give it a try.

Norwegian Yule Kage

Using an old family recipe card.
Ingredients:

1/2 cup butter
3 tablespoons sugar
2 cups milk
1 yeast cake
(I used 1 1/2 pkgs active dry yeast)
3 tablespoons lukewarm water
3 eggs
6 1/2 cups flour
Scald milk then add butter and sugar.
1 teaspoon salt
1 cup raisins
1 cup citron
1 teaspoon ground cardamon

Directions:

Scald the milk. I had to look this up. Bring the milk to almost boiling then allow it to cool slightly. Add the butter and sugar, and let the mixture continue to
Activating the yeast in a small bowl.
cool until lukewarm.


Dissolve the yeast in lukewarm water (100-110 degrees). If the water is too cold, the yeast won't activate. If it is too hot, the yeast will be killed. Stir occasionally. The yeast gets bubbly, releasing carbon dioxide gas, the stuff you need to make bread rise.


Mix in cooled liquid, yeast and eggs.
When the milk mixture is cooled, add it to 2 cups of the flour and salt. Beat thoroughly. I used a wire whisk but this could be done with an electric mixer.


Then add the dissolved yeast followed by three well beaten eggs. Beat the whole mixture until everything is fully incorporated and smooth.


Adding the raisins, citron and cardamon.
Add the raisins, citron and cardamon, and blend together while the dough is still in a liquid form.


Add the remaining flour a little at a time. At this point I switched from the whisk to a large wooden spoon. At the end, it was easier to mix the last of the dry flour in with my hands.


Knead on a floured bread board.
Turn the dough out onto a floured board. Knead for 8-10 minutes until the dough becomes smooth and elastic. Work in any citron and raisins that escaped.


Place dough in a large greased bowl. I used soft margarine. Roll the dough over in the bowl to get some of the margarine on top of the dough to keep it from drying out. Cover the bowl. I used plastic wrap covered with a tea towel. Grandma's recipe card called
Let the dough rise in a warm place.
for a damp cloth.


Let the dough rise in a warm place for about two hours, or until double in size. Mine took one and a half hours in front of the fireplace.

Punch the dough down and divide as desired. I cut mine in half for two large loaves. Form the dough into balls.

Divide dough into loaves to rise again.
I used 9-inch glass pie pans to make round loaves.  Grease the pans and roll the dough to moisten the top. Loosely cover. I used plastic wrap again. 

Place the dough in a warm place and let it double in size again (about 45 minutes).

Bake in a 350 degree oven for 30-40 minutes or until golden brown. Test by tapping the top with your finger. It should have a hollow sound when it's done.
Ready for the oven.

Remove the bread from its pan and cool completely on a rack. If you like a crispy crust, store it in a paper bag. If you want a soft crust, store it in an airtight plastic bag. 

For me, Yule Kage is not complete without gjetost cheese on top. The brand I find in the States is Ski Queen. It's a semi-hard cheese made from whey, milk, goat milk and cream.  It has caramel colour, has a unique flavour, and melts in your mouth. It always reminds me of going to Grandma's house for Christmas.

Norwegian Yule Kage cooling on racks.
I remember Mom's bread as  dense and firm. Mine was more tender, almost like white bread. Also, the cardamon flavour was more subtle. Mom ground her own, so I'm guessing it had a more pronounced flavour.

Next year when I make Yule Kage, I'll try all-purpose flour like Mom used and add extra ground cardamon. Other than that, I'm very pleased with Christmas bread.


I couldn't wait. I cut a slice, toasted it with butter, and topped it with gjetost. Closing my eyes I could feel my family enjoying Christmas and New Years morning with me once again.

Do you have any traditional holiday foods that make you feel connected to your heritage? -- Margy

Tuesday, December 27, 2016

Winter Flying


Inside the cockpit in 997.
This time of year flying weather is either great or horrible, not much in between. Christmas Day turned out to be a perfect one.

We just had snow followed by cold, but the ramps, taxiways and runways were clear. A busy airport like Bellingham International has lots of snow removal equipment.

We got our airplane 997 out of the hangar and she was eager to fly. The engine cranked immediately and warmed up to a steady hum.

Bellingham Ground, Piper Arrow N41997 at the fuel pumps with Oscar ready to taxi.  Arrow 997 cleared to taxi to runway 34 via Foxtrot Alpha Golf.


We departed towards the north and did touch-and-go landings in crisp, calm air.


On the downwind leg we had a beautiful view of Mt. Baker capped in snow.


And Bellingham by the Bay.


Arrow 997 cleared to land runway 34. The end to a fun winter flight.


After landing, we thanked the air traffic controllers in the tower for working on the holiday so we could enjoy our aerial tour of Beautiful Bellingham.

Come fly with us on adventures to other destinations in Wayne's book Flying the Pacific Northwest.

"Take the controls of a Piper Arrow as your personal flight instructor leads you to out-of-the-way spots in a recreational aircraft." It's a good read for pilots and aviation enthusiasts alike. -- Margy

Tuesday, December 20, 2016

Cinnamon Spiced Apple Snow Cone


Our float cabin after a fall snowstorm.
I grew up in a big city way down in Southern California. The only snow we saw was up on the mountain tops. That makes it a special treat for me.

Where we now live in a float cabin on Powell Lake in British Columbia, there's just enough snow to make it fun, not drudgery.

This week we got several inches so soft and fluffy I called it cotton candy snow.

I went out with a spoon and gathered a cup full to make a big snow cone. I didn't have any syrup, but I did have an open jar of the cinnamon spiced apples I canned earlier in the fall.

Canned spiced apple syrup makes a yummy snow cone.

I drizzled my homemade syprup over the top and stirred it in. The result was a sweet, cold treat to celebrate this special occasion. Unfortunately, rain came and all my luscious cotton candy snow was washed away. But I'll be ready with this new jar of apples when it happens. -- Margy

Monday, December 12, 2016

The Pow! Town Roller Derby


Wayne and I got hooked on attending roller derby games last year in Eugene, Oregon. Since then we've gone to games in Bellingham, Washington, and here in our hometown of Powell River, BC.

The Pow! Town roller derby teams are the Thunder for adults and the Brawl Stars for youth.  They now they have their own dedocated venue called the Thunderdome. The interior is one large room with a cement floor that they have lined out for their flat track.

The Sin Bin is the penalty box.

On Sunday we went to a pre-season scrimmage. The team is mostly women of all ages, but there are a few men players.

Players and referees have funny nicknames and often dress in costumes.

Today, roller derby is similar to the old banked-track games televised in the 60s and 70s, but the track is flat and the contestants come from all walks of life to enjoy the sport.

If you live in Powell River, watch for future Pow! Town events. If you live somewhere else, I bet you have a roller derby team nearby. Check it out, you might like it. You might even want to try out for one of the teams and join in the fun. -- Margy

Wednesday, December 7, 2016

Repurposed Baking Soda Container


Repurposing a plastic Parmesan cheese container and lid.
I was reading some recent homesteading link party posts and came across this interesting one called Repurposing a Parmesan Cheese Container at the Taylor-Made Homestead blog.

I'd just finished my Parmesan cheese. I'd cleaned the contained and saved it on my pantry shelf without a purpose in mind. Now I had one.

Tammy Taylor explained on her blog how she used the lid of a Parmesan cheese container with a half-pint canning jar with a regular mouth to make a new storage container for her baking soda.

One box of baking soda in it's new repurposed container.

I've always left my baking soda in it's box even though it's hard to get a measuring spoon in the small opening and out with the exact amount needed.

The flat opening allows you to measure exactly what you need.

Since I had a full box of baking soda, I decided to use the plastic container with it's flip-top lid just as it was. In addition to using the wide flat opening for measuring spoons, the side with round holes makes a shaker to use baking soda for cleaning projects. How cool is that?

I taped on labels from the box so I could clearly identify the contents.

Thank you Tammy for the inspiration to "Use Whatcha Got!" Another item is saved from the landfill, or at least gets a second life before it moves on to the recycle depot. And what of the old box? I repurposed it into fire starter for our woodstove.

Now that's a win, win, win. -- Margy

Thursday, December 1, 2016

Pacific Coastal Airlines


When it's time for Margy to go meandering, the first step is to get from Powell River to Vancouver. And then when I'm through exploring, a reverse trip is necessary.


The easiest and quickest way to get to and from Powell River, BC, is by air. If you have your own airplane, you can fly into the Powell River Airport (CYPW). For most of us, the best choice is Pacific Coastal Airlines.


Pacific Coastal had its origins in Powell River. Powell Air Ltd. flew Convairs out of Vancouver and Powell River and float planes from the government dock on Powell Lake. In 1979 they merged with the Port Hardy division of AirBC creating Pacific Coastal Airlines. From these humble beginnings, Pacific Coastal now serves fourteen cities in BC from two hubs, Vancouver's South Terminal and Port Hardy.


Pacific Coastal's fleet of planes is matched with the destinations they serve. They include the Saab 340A (30 passenger turboprops), the Beechcraft 1900C (19 passenger turboprops), the Beechcraft King Air 200 (8 passenger twins), and the Grumman Goose and de Havilland Beaver (floatplanes). In addition to their scheduled runs they also provide customized charter services.


I catch Pacific Coastal at Vancouver International Airport's South Terminal. If you are arriving at the main terminal, they provide a courtesy shuttle service. Pick-up points include Pillar 2 on the international arrival level and outside doorway "F" on the domestic arrivals level.

I have a tradition when I arrive at the South Terminal. I stop at the Galiano Cafe for a Kokanee and a bite to eat while I wait for my plane. This counter restaurant provides excellent salads, sandwiches and my favourite, wonton soup. It's just the thing to tide me over before having dinner when I arrive in Powell River.


Pacific Coastal has a discount program for frequent fliers called Quick Pass.

Benefits for placing a deposit on account include: 20% discounted price, online booking, sharing with family and friends, and pre-boarding privileges.

Having Quick Pass really works out well for Wayne and me.


I know I'm almost home when I hear the co-pilot over the intercom, "Please fasten your seat belt, we are beginning our descent into Powell River. If anyone needs a taxi upon arrival, please raise your hand." Now that's service!

Come fly with Pacific Coastal Airlines and I hope your destination will be Powell River, Coast by Nature. -- Margy

Saturday, November 26, 2016

Saving Dahlia Tubers in Containers


Step 1: Insulate the Dahlia container in bubble wrap.
Two years ago I dug up my dahlia tubers and kept them all winter at the town condo in the guest bathtub.

The tubers were hard to dig, and needed added moisture in their protective sacks ever few weeks. But, most of them did survive for replanting.

Last fall I tried something different. I wrapped my dahlia containers with bubble wrap and covered the soil with a heavy mulch.


In summer, the dahlias gave me lush plants and beautiful flowers. I would call that a huge success with very little effort.

Step 2: Cut the Dahlias back in fall.
This year I decided to repeat the same procedure.

We don't get extreme cold, but do have several stretches of freezing weather.

I left the bubble wrap on the pots, so that step was already done.

Click here to read more about it. Save the small sized bubble wrap from parcel packaging. You'll have a free supply for winterizing projects.


Step 3: Cover the soil with crumpled newspaper.
The air pockets help keep the freezing temperature away from the sides of the pot, much like an insulated water pipe.

When the weather started turning cold and the foliage died, I cut the dahlia plants back to an inch above the soil level.

I crumpled newspaper over the soil to give the tubers an insulation barrier.


Step 4: Cover the newspaper with a piece of cardboard.
Over the top of the newspaper I put a layer of cardboard, and topped it off with soil to keep everything in place on windy days.

I don't have a place to bring the containers indoors at the cabin where temperatures won't get below freezing sometime during the winter.

This has been a good alternative for me, and I've successfully winterized my rhubarb the same way since 2010.


Step 5: Cover the cardboard with soil to hold everything in place.

Have you ever kept dahlias outdoors through the winter? Do you get freezing nights? Was it successful for you? -- Margy

Thursday, November 17, 2016

Patio Baby Eggplant Parmesan Bites


Patio Baby eggplants are about the size of a real egg.
I purchased a Patio Baby Eggplant seedling without really knowing what it was. I wanted a smaller eggplant, and that’s what I got.

The Patio Baby Eggplant was developed for pots and small gardens. It grows into a slender bush about a foot and a half tall.

Mine didn’t start producing fruits until late summer. The plant information says it will continue until the first frost.


Cut, dip, dredge and fry.
The small fruits fit in your hand. In fact, several will. I decided to make individual Eggplant Parmesan Bites due to their diminutive size.

I cut each eggplant into three slices lengthwise.

I beat one egg with milk and prepared a coating out of equal parts flour and cornmeal seasoned to taste with sea salt.


Fry until lightly browned.
Each slice went into the egg mixture, dredged in the cornmeal and flour mixture, back to the egg and finally back to the flour mixture again.

Fry the coated eggplant in olive oil using medium-high heat until they become soft inside and the coating becomes lightly browned. Drain on a paper towel until they are all done.

Arrange the little bites on a baking sheet liberally coated with cooking spray.

Assemble the bites with sauce and cheese.
Top each eggplant bite with a dollop of prepared spaghetti sauce (commercial or homemade), a shake of Parmesan cheese, and a small slice of mozzarella cheese.

Bake the bites at 350°F until  the cheese on top is melted and bubbly.

I served my Eggplant Parmesan Bites as a dinner entree with salad.

The cheese is melted and they are ready to enjoy.

My Patio Baby plant produced enough little eggplants to make this recipe three time over the summer and fall. If you live in a warmer climate, you might even get more for a longer time.

Do you have any favourite eggplant recipes that you would like to share? -- Margy